
Last week I posted about making burlap rag wreaths for my front doors, so I’m sure you’re thinking “why would you need more Valentine’s wreaths?” Well, Mother Dearest needs wreaths too! Her doors are much more exposed than mine are, so I thought I’d give that Deco Mesh stuff a shot.
I have to be honest here: I don’t really like Deco Mesh. I usually see wreaths made of this stuff and think they look cheap. I think it’s the bubble construction that gets to me. Something about it makes my teeth hurt. Anyway as much as I don’t like it, it really is an ideal material if your wreath is going to get rained on. Because I didn’t like the fluffy bubble wreath look that everyone likes with this stuff, I wanted to find a different method.
At first I was just going to cut strips out of the mesh and tie those strips to the wreath form. But once I started that, I saw that the mesh was curling up on me in an interesting way. So I decided to wire coils of the mesh onto my wreath. The result is a curly deco=mesh wreath that I really like!
Materials

One 12″ wire wreath form
Several colors of DecoMesh – 12″ width
Floral wire
Okay, so the first step here is to cut your mesh into about 8″ lengths. This is definitely not something that you need to measure. Since I was using four colors, I only cut five strips at a time of each color. I think that made it easier to keep track of how much of each color I was using.

Next, take one of those strips and roll it up into a coil. Pinch the middle of the coil and wrap a piece of floral wire around that pinched spot.

Wire the coil to your wreath form. Because these coils are going to stick out quite a bit over the edge of your wreath form, I recommend only wiring coils to the middle rungs of your wire wreath form. This keeps the wreath a little more manageable.
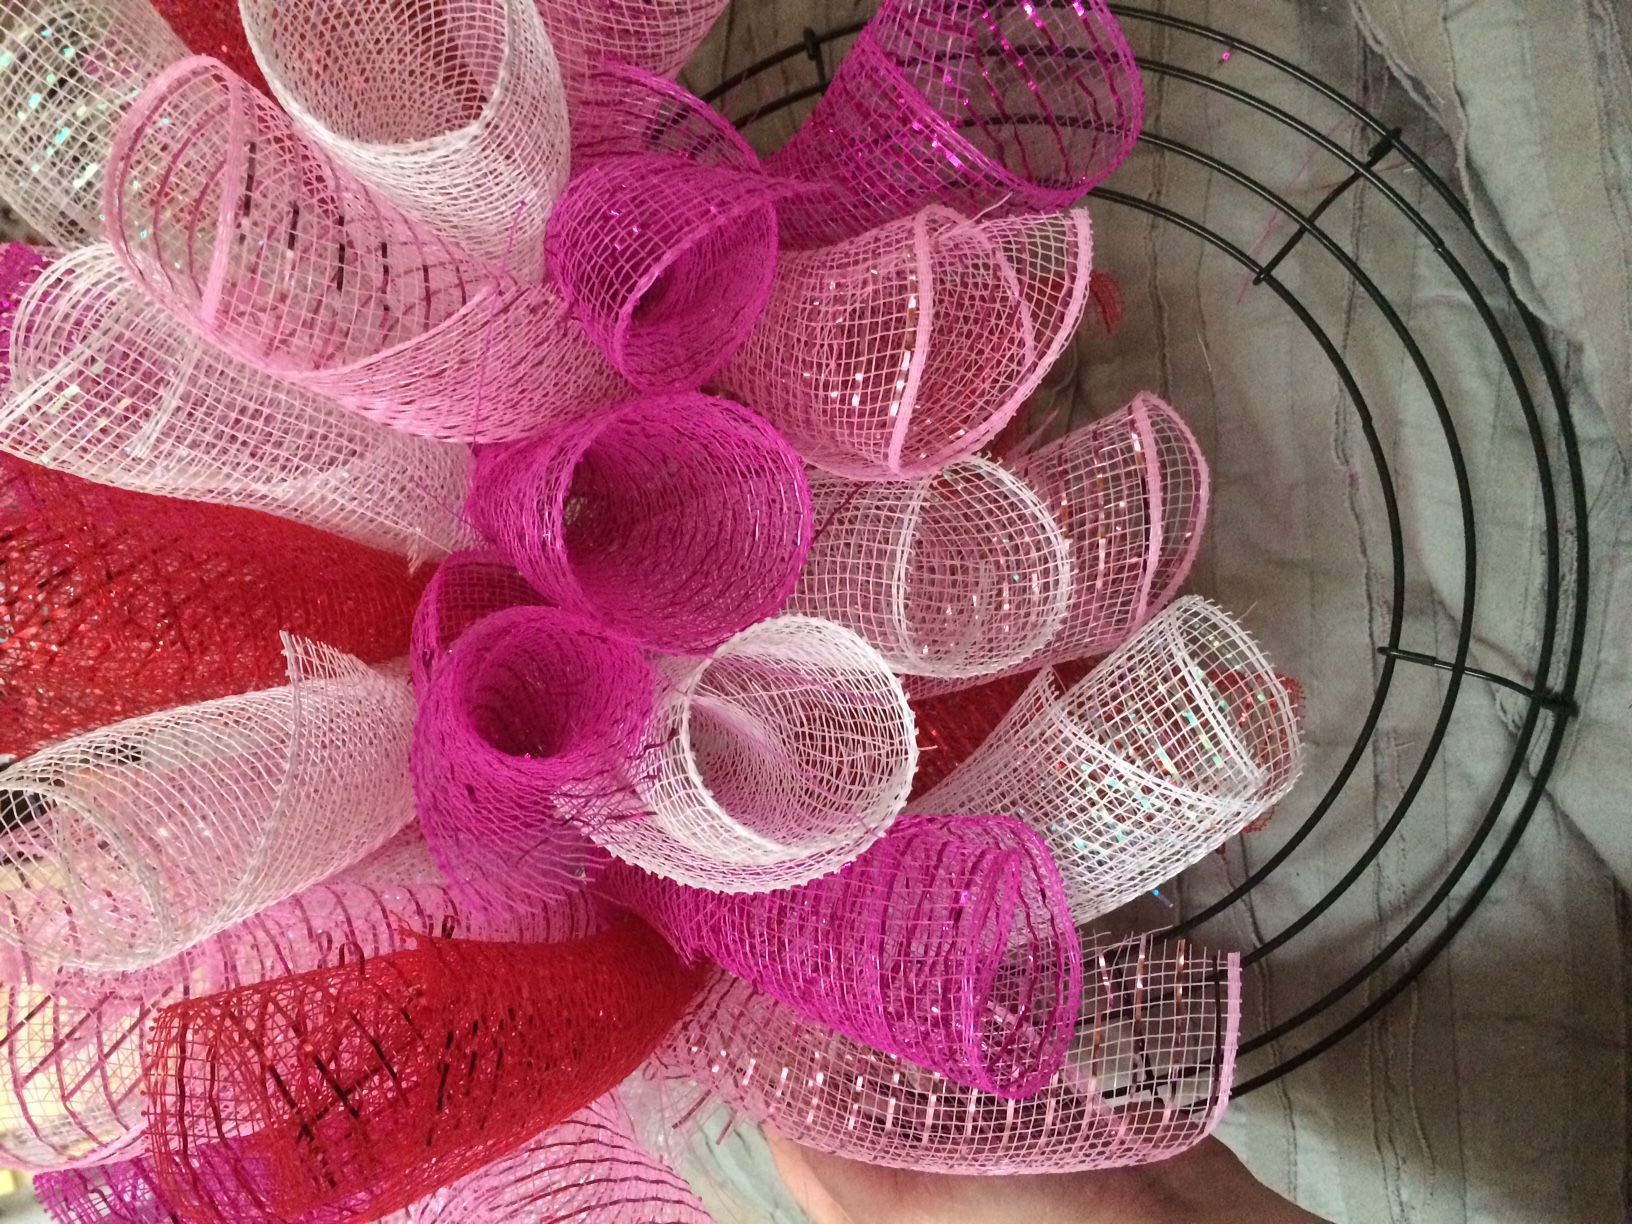
From there, just keep doing the same thing. Make sure to mix up your colors in a way that you don’t end up with giant blocks of the same color (although maybe that would look cool too).
This process took about an hour for one wreath (or 2 How I Met Your Mother reruns). I’ll be making another later tonight. One thing you never think about when you build or buy a house with double doors is that you’re always going to need two wreaths!
It’s also hard to estimate the cost here. I spent $50 on materials for two wreaths, but I think I only used about half of the Deco Mesh. Maybe even less than half. So if I was going to make four wreaths I’d end up spending about the same amount on materials.

I am going to try making your wreath. I took notes,this will be my first time making a deco wreath. The only wreath that I have ever made was made with a wire hanger and tissue paper. Wow I really feel old. I’m thinking about using Red, white, blue and a splash gold. Wish me luck…LOL
Good luck! I think it would be fun to add in some of that silver wire garland that you find in the gift wrap section. The kind with stars?
Here’s a link to what I’m talking about: https://www.amazon.com/gp/product/B0776B7XT6/ref=as_li_tl?ie=UTF8&camp=1789&creative=9325&creativeASIN=B0776B7XT6&linkCode=as2&tag=livfultim-20&linkId=66421d1469e6c49e25e2f7c8a5edecc0
I think if you tied some of pieces of this to the frame (maybe one piece of tinsel for every five curls of mesh?), and then curled the tinsel around your finger, that would look really nice with your patriotic wreath!
You can spray the wreath with holding spray or adhesive spray to stop the mesh from shedding or or unraveling
Thank you for sharing this info! Drives me nuts fraying!
What do you do with the raveled edge where you cut. I don’t like that when you can see it.
Oh, I didn’t find that the edge of the deco mesh raveled for me so I didn’t do anything about the edges. I wonder if different brands ravel more than others? If it helps, I bought mine at Hobby Lobby.
What do you do with all the raveled edges. I don’t like the looks of that.
It looks like she rolled the cut edges in and the finished edges are on the out side. That’s probably why she didn’t have much fraying…
There are two cut edges to each coil. One is running lengthwise inside of the coil and one is lengthwise on the outside. I called my Mom to ask her to check on the fraying for me, and she said that the “outside” cut edges aren’t frayed either.
Maybe Hobby Lobby just has the best deco mesh? Burlap wreaths though . . . what a mess! With those, I purposely make them in a way where I won’t mind the fraying. There’s no avoiding it!
I put mod podge on the frayed edges and it doesn’t fray
This looks great, and I’m going to try it! How many coils of each color did you wind up cutting? Thank you!
Darcy
Gosh. I simply don’t know. I’d go count the loops on each wreath, but I’m not in the same state as the wreaths anymore!
If you end up making the wreath and counting the loops, please report back!
Do you do each color coil wired to frame individually do you do 2 or three colors and wire togerther
I wired each coil separately. I’m too clumsy to handle multiple coils at once!
Well, I am late to this party! But I am attempting to make a wreath for my front door which I will put out on each day the Philadelphia Eagles play. (They won the super bowl last year BTW. So I have their colors, green, silver, white and a little bit of black. Doing the cut mesh method… love the look and it looks pretty forgiving should I mess up. I have made fresh green wreaths at Christmas… and this may work out some what the same in terms of process. I will yell for help should I get stuck. Thank you for posting these instructions.
It’s so wild that all of a sudden people are visiting this post. I guess someone with a real following must have pinned it this year?
I’m so inexperienced. Does my site allow you to post photos in the comments? If so, I’d love to see a picture once your wreath is done!
Awesome idea and wonderful instructions.
How do you cut your Metallic Mesh without having string on the end and cutting in a straight line.
How do you cut your Metallic Mesh without having string on the end and cutting in a straight line. I have purchased my materials from A.C. Moore, Wal-mart, Michaels they all raveled at the edges
I have been making the curly deco mesh wreaths for a few months now and find two options to deal with those annoying threads. One is to use a rotary cutter and minimal handling. The other is to use a soldering iron to cut it. I use a cookie sheet and metal ruler to heat cut the strips. It melts the edges so unraveling is decreased. The more experience you have handling the mesh the less problems with those threads.
I have made so many that have frayed or unraveled that I’ve just become accustomed to dealing with this. I do, however, use a rotary tool for the cutting and I still, at times, experience the fraying. I’ll just have to try the cookie sheet and soldering iron though. Thank you for posting this, I’m looking forward to trying this.
How many made up mesh do you add per section on the wire ring?
I used my big paper cutter to cut my pieces…it worked out beautifully!
Use an impulse sealer (Amazon) or a wood burning tool to cut the mesh and seal it. It melts together. But you should do it outside or wear a mask, a filtered mask.